nikons-new-astrocamerahttps://www.astronomy.com/observing/nikons-new-astrocamera/Nikon’s new astrocamera | Astronomy.comWith 24 megapixels of resolution, Wi-Fi, and a vast ISO range, the D750 was built to shoot the night sky.https://www.astronomy.com/wp-content/uploads/sites/2/2021/09/ASYER1119_02.jpg?fit=1568%2C1380InStockUSD1.001.00astrophotographyobservingtelescopes-equipmentarticleASY2023-05-182019-11-0144880
With 24 megapixels of resolution, Wi-Fi, and a vast ISO range, the D750 was built to shoot the night sky.
By Tony Hallas |
Published: November 1, 2019 | Last updated on May 18, 2023
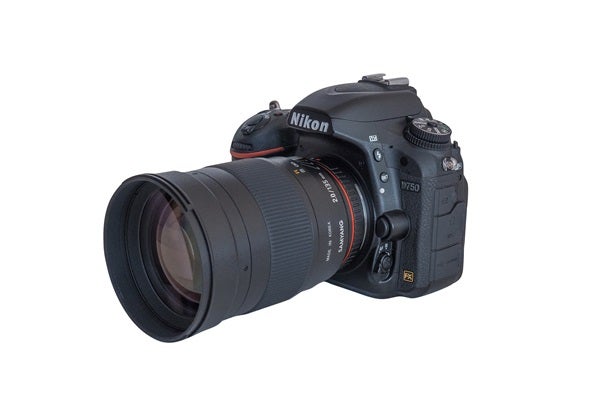
Nikon’s D750 DSLR sports a full-size, 24-megapixel CMOS chip and the company’s EXPEED 4 processor.
All Images by Tony Hallas
The Nikon D750 is the best DSLR I’ve used for sky shooting. If you’re new to astroimaging, the learning curve for a camera like this is steep, but the results are well worth the effort.
The D750 has a full-size 35mm sensor — the 24.3-megapixel Sony IMX 128 CMOS chip — coupled to the Nikon EXPEED 4 processor. The large 6.0-micron pixels absorb light better than the smaller ones found in most cameras, but don’t let the large pixels fool you — a full-frame image measures a generous 6,016 by 4,016 pixels.
On the outside
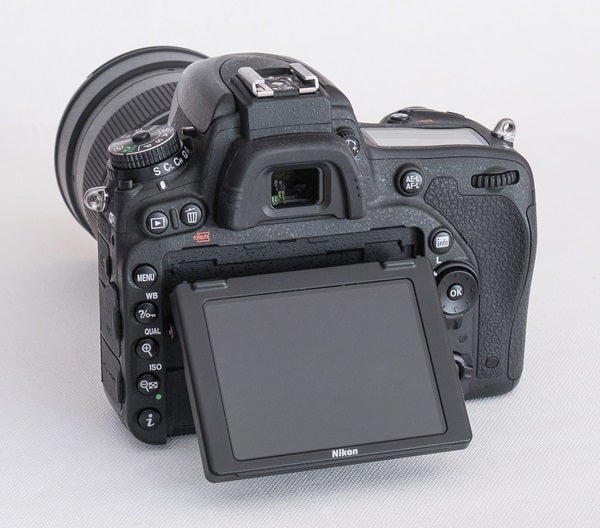
Ergonomically, the D750 has an articulating rear screen, so no straining your neck when shooting at the zenith. And the live view makes accurate focusing as easy as finding a star, enlarging it, and focusing it to a point. Another nice feature of the live view is that once you center a star at low power, it stays in view at higher powers, even though it might be located toward the edge of the frame.
The camera’s body is lightweight, with weather-sealed monocoque construction, carbon fiber-reinforced polymer in the front, and magnesium alloy for the top, sides, and back.
Most of the controls you’ll need to take great images are on the back of the camera. The vari-angle LCD screen makes viewing it easy no matter where the camera points.
On the inside
The Nikon D750 stands out among its peers in the quality of the images that it can produce, and that starts with the sensor. The IMX 128 performs on-chip, analog-to-digital signal conversion combined with two-step noise reduction. The advantages of a CMOS chip are high noise immunity and low static power consumption.
Because the IMX 128 is so light sensitive, the Nikon D750 is “ISO invariant,” which means an image shot at ISO 400 is going to look just like an image shot at ISO 1600, or even 3200. The noise level is so well controlled that it’s possible to underexpose an image and stretch it back so it looks normal. This allows you to bring deep shadow detail to the surface.
The IMX 128 would be nothing without great support. In the D750, that support comes from the Nikon EXPEED 4 processor. A partial list of the tasks it accomplishes includes Bayer filtering, demosaicing, dark-frame subtraction, noise reduction, sharpening, scaling, gamma correction, and chroma subsampling. It accomplishes this with multiple core processors with an on-chip 32-bit microcontroller. The result is extremely high-speed sensor readout combined with low power consumption. The battery life is estimated at 1,230 exposures.
My first impression of the D750 was, “Where’s the noise?” I took one- and two-minute exposures at ISO 3200 and 6400 to test the ISO invariant claim, and there was no noise. Plus, the modified camera I used was blue sensitive, so images showed great color balance.
The controls
Astroimagers have certain steps they need to take. The most common are focusing and setting the exposure time. The controls on the D750 are well positioned for this purpose. The only limit is that the D750’s internal timer only goes to 30 seconds; going longer requires an external timer.
One of this camera’s best features is its ability to display histograms, which help you capture deep shadows and avoid burning out highlights.
Above the “ISO” button is the “QUAL” button. Holding it down while scrolling with the rear wheel allows you to choose the quality of image setting. Choose “Raw” if you process your images. To see at a glance what all your settings are, press the “Info” button below the back wheel.
Note that the left-hand buttons have dual functions depending on the mode you’re using. For example, in live view mode, which you’ll use for focusing, “QUAL” will switch automatically to the “Zoom in” button. It’s marked with a “+.” The “ISO” button becomes the “Zoom out” button. It’s marked with a “–.”
When you turn on live view, you’ll see a square. Put your focus star into the middle of the square by using the directional dial under the “Info” button. Once centered, it will stay there as you zoom in to inspect the focus. Exit live view by pushing the “Info” button once more.
I’m often asked, “How do I know when I have the correct exposure?” My answer is by not looking at the image on the screen, but instead inspecting the histogram. The left-hand boundary is black, the right is white. If any of your graph touches those boundaries it means that parts of your image have no detail.
To view the histogram, first program the camera for this function. Go to “Menu” > “Playback menu” > “Playback display options” > “Histogram.” Make sure there is a checkmark in the square. When you exit the menu, the camera knows you want to see histograms.
After you take a picture, hit the button that has a triangle within a rectangle (on the back at top left) to bring up the image. Press the multi-directional button (the one with “OK” in the middle of it) up or down to bring up the histogram. Pressing that button left or right will toggle between your images.
As far as the lenses I use, I prefer the Sigma Art 14-24mm for my general imaging lens and the Samyang 12mm f/2.8 fisheye for 180° images. For higher power, any of the Sigma Art lenses work well with this camera. Remember that this camera has a full-frame chip when choosing a lens.
Make it better
To get even more out of your camera, have it converted so it can capture Hydrogen-alpha (Hα) light. I sent mine to Spencer’s Camera because they specialize in this kind of work.
I had them remove the camera’s infrared/ultraviolet blocking filter and install one that still blocks IR/UV, but also opens up a window for Hα wavelengths. One option I didn’t choose was the removal of the anti-alias filter. I also left the dust removing device intact.
With this modification, the camera will produce images with a red bias, but you can remove that in processing and still use it as a terrestrial camera. It costs about $500 and takes one to three weeks.
Top of the line
The Nikon D750 is a quantum leap in DSLRs for astroimaging. Low noise combined with ISO-invariant sensitivity is a real winner in the world of CMOS and astrophotography. With a converted camera, you’ll be even more amazed at the quality of your images.