using-masks-part-3https://www.astronomy.com/observing/using-masks-part-3/Using masks, part 3 | Astronomy.comAstroimager Adam Block shows you how to combine several processing techniques with masks to improve your images.https://www.astronomy.com/wp-content/uploads/sites/2/2021/09/Image1-4.jpg?fit=1024%2C829InStockUSD1.001.00astrophotographyarticleASY2023-05-182014-11-2438585
Astroimager Adam Block shows you how to combine several processing techniques with masks to improve your images.
By Adam Block |
Published: November 24, 2014 | Last updated on May 18, 2023
I have now covered enough material in past articles that we can combine several simple techniques to powerfully process data. In this column, we will take what we learned about creating object masks (see November’s and December’s columns) and a properly prepared luminance image (see October’s column) to blend a sharpened image with its original, slightly blurred self.
What imagers refer to as “deconvolving an image” often results in as many artifacts as benefits. The primary goal is to use a mask to reveal only the good (artifact free) parts of a sharpened layer. Typically, the areas of low signal show signs of “curdling” of the uniform noise grain, and areas of discontinuity, especially around bright stars, show a ringing effect.
The first step is to sharpen the image using a deconvolution algorithm. Monitor only the features you want to sharpen (not the brightest stars — see below). Most programs have a version of the Lucy-Richardson algorithm, which I recommend because it iteratively converges on solutions by making the image sharper as it goes along. Generally, you will specify a point-spread function by clicking on stars in the image to begin. I’ll explain getting the best results from deconvolution in a future column.
Once you have a sharpened version of your image, you must permanently stretch it (see October’s column again) and the original in the same way so that you can blend them in Photoshop. One thing to remember is not to let your bitmap values exceed 200 grayscales.
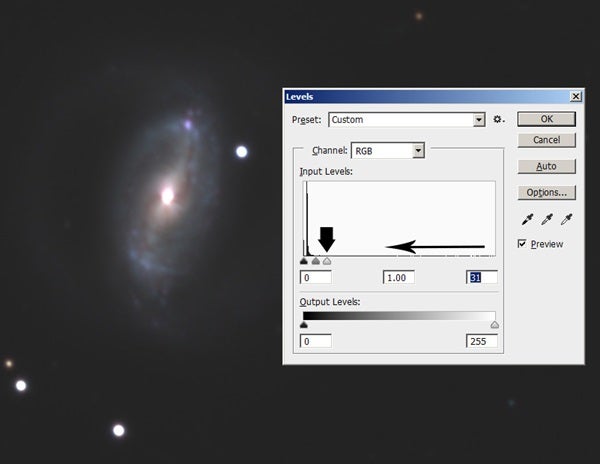
Your second major step will be to adjust the mask by clipping both the background and brightness features. For this mask, the author applied a 3-pixel Gaussian blur.
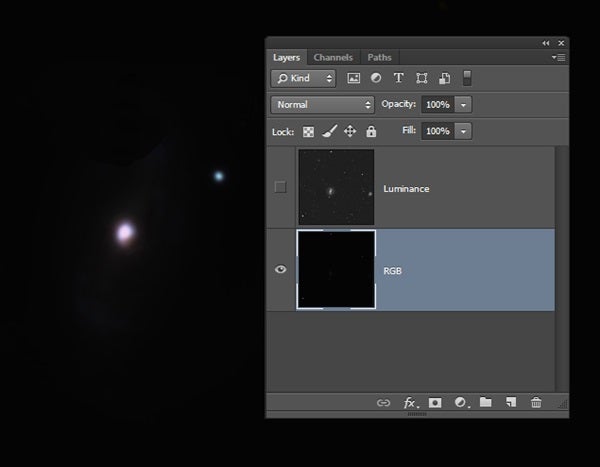
Save these two images as TIFF files, and open them in Photoshop. Copy the sharpened image, and paste it onto the original image so that you have two layers. Next create a new layer mask for the sharpened (upper) layer. Paste a copy of either layer into your layer mask. You now have an object mask, and your screen should look like the image at top left.
The key is to adjust the object mask so only the brightest parts of the upper sharpened layer show and noisier aspects are hidden. The layer mask is nicely in the correct grayscale scheme with the object(s) being white and the background black. By using “Levels,” adjust the mask so that everything you want sharpened is white in the mask.
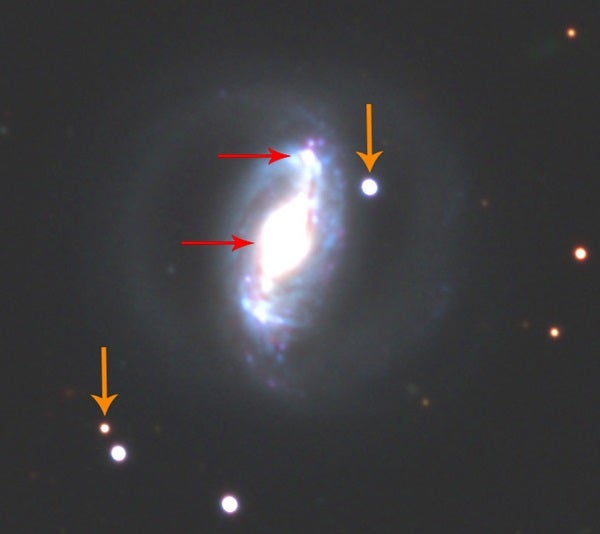
After you use software to sharpen the image to the left of this sequence, the galaxy improves dramatically (above left), but the bright stars — like the double star above the galaxy — have undesirable processing artifacts (center). The right frame shows how the author painted on the mask (inset at right) to hide the rings around the stars and reveal the original stars with a sharpened galaxy.
Let dimmer regions of the object remain gray, and raise the black level to completely clip the faintest parts of the image (see below left), but don’t turn it all black and white. It is important to keep some gray features so that there will be smooth transitions between the upper layer and the original image in the final result. You can improve these transitions by applying a small Gaussian blur of 3 to 4 pixels in strength to the mask, but it isn’t always necessary.
When you do the above, the ring artifacts and harsh edges of the brightest stars will remain. Saturated stars do not have the profile you expect, so they suffer when you sharpen the image, and the object mask reveals them. Generally, they are few enough to manually fix. Using the “Paint Brush” tool, circle the edges of the bright stars in black on the object mask. This will hide the artifacts and show the original star profile (see the sequence at left). Paint with a 50 percent brush opacity for finer blending control.
In a few minutes, you will have a virtually artifact-free sharpened image of your favorite deep-sky object! In my next column, I will show you one of the most satisfying processing techniques there is — manipulating an image in the “Lab” color space.

