Hydrogen-alpha, or Hα, emission is abundant in many deep-sky objects such as the Rosette Nebula (NGC 2237–9), Veil Nebula (NGC 6960 and NGC 6992/5), and North America Nebula (NGC 7000), to name a few. Because this wavelength carries high detail, imagers covet it as a source of information to augment their LRGB data.
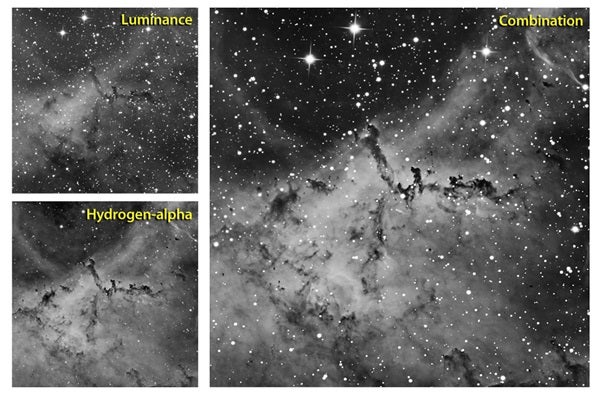
In the next several columns, we will look at various ways to add the Hα information to our color images. First, let’s look at a comparison between the luminance and the Hα of NGC 2244, the open cluster associated with the Rosette Nebula, along with NGC 2237–9, the surrounding nebulosity.
Hα filters are deep red. They pass the Hα spectral line but little else. As a result, stars appear much fainter (and, therefore, smaller) in the Hα exposure because only a small portion of their light hits the CCD chip. Most of the Hα nebula detail comes through, however, and here (as in many other nebula shots) it is spectacular.
Images through the luminance filter favor many other wavelengths over the subtle Hα component. The imager’s goal is to blend these two together to create a hybrid luminance with representation from Hα.
Furthermore, it is possible to move one step further and convert the Hα to color and enhance the RGB component with it. Let’s first combine the Hα and luminance in black and white to see how that works.
Step 2: Open the luminance image in Photoshop. This will be the background.
Step 3: Open the Hα image, open the “Layers” palette (F7), and drag the icon of the Hα image on top of the luminance image. This will turn the Hα portion into a layer sitting atop the luminance.
Step 4: Make the “Combine” mode “difference” and, holding down the “control” key and the left mouse button, drag and center the Hα layer over the luminance image. Let go of everything.
Step 5: With the Hα layer active, change the “Combine” mode to “lighten.” Here’s where the magic happens. Photoshop will look at both images, and where the Hα image appears lighter, it will use that data. Note that the stars on the luminance image take priority because they are lighter than the Hα ones. The advantage of the “lighten” method is that by changing the density of the Hα layer, you can adjust how much of that image contributes to the luminance. If you lighten the image, Photoshop will add more of it to the final image. By darkening the Hα image, less of it will appear.
There is another way to combine the Hα with the luminance: Use the “screen” mode instead of “difference.” This is more of a balanced approach to adding the Hα data. You can also fine-tune this method by adjusting the density of the Hα layer.
Experiment with both methods until you find what works best for you. You can add a little more Hα to your finished image by duplicating the Hα layer and using the “soft light” combine mode for this layer. Best results occur if you make the opacity of that layer between 33 and 50 percent.
In next month’s column, I’ll show you how to use these techniques to create a color version of your image.