Nearly a year ago, on August 6, 2014, the European Space Agency’s (ESA) Rosetta probe entered orbit around Comet 67P/Churyumov-Gerasimenko. Three months later, on November 12, the Philae lander bounced to a precarious stop on the comet’s surface. For 57 hours, the lander worked feverishly to explore its surroundings before battery power ran out. Philae then went into hibernation, awaking in June once its solar panels could turn the power back on.
Yet not all is rosy with the lander, apparently — it last communicated with Rosetta two weeks ago (on July 9). Part of the problem appears to be in establishing a solid link between the two spacecraft. The task has become harder as the comet approaches the Sun and becomes more active, forcing mission controllers to move Rosetta farther from the nucleus and making communications between the two probes difficult. The comet’s activity should peak around its closest approach to the Sun, which arrives August 12/13.
ESA scientists hope to reestablish consistent contact with Philae so that it will be able to monitor the surface during this critical period. But in any case, Rosetta will continue its daring reconnaissance from above as scientists strive to learn more about these visitors from the solar system’s depths.
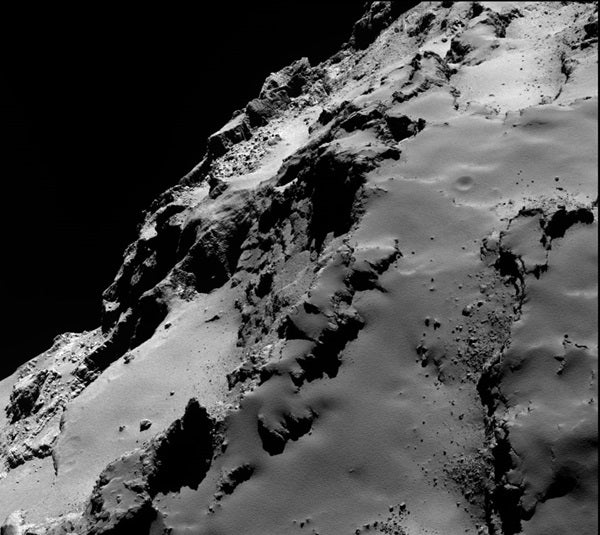
Here we present some of the best recently released images from Rosetta showing many incredible landforms on Comet 67P’s surface.
ESA/Rosetta/MPS/OSIRIS Team
Comet 67P’s large lobe lurks in the foreground while a section of the smaller lobe looms behind. This two-image mosaic shows the Apis region (the flat area in the left foreground) where it meets the more rugged Atum region. (In keeping with the ancient Egyptian theme used for both the Rosetta and Philae spacecraft, mission scientists have named the comet’s various regions after Egyptian deities.)
ESA/Rosetta/MPS/OSIRIS Team
This image features the smooth Hapi region that dominates the comet’s neck. Notice the surface ripples in this area as well as the fracture to its right, which belongs to the Anuket region of the small lobe.
ESA/Rosetta/MPS/OSIRIS Team
Part of the comet’s large lobe fills this close-up image of 67P. The field shows the stark contrast between the dust-covered smooth areas of the Ash region and the more brittle material of the Seth region.
ESA/Rosetta/MPS/OSIRIS Team
This section of the comet’s large lobe belongs to the Khepry region close to its boundary with Aker off the bottom of the image. Although Khepry has an overall rough surface, smooth areas exist is some depressions.
ESA/Rosetta/MPS/OSIRIS Team
This image explores a boundary region on the comet’s small lobe. At the top right lies the dust-covered Ma’at region. The dust gradually thins out into the rougher terrain of the Maftet region.
ESA/Rosetta/MPS/OSIRIS Team
The relatively flat Imhotep region resides on the comet’s large lobe. This close-up shows a small part of Imhotep containing several round structures that scientists have yet to figure out. The features range from 7 to 195 feet (2 to 59 meters) in diameter, and each has a rim with either a mesa or a depression at its top.
ESA/Rosetta/MPS/OSIRIS Team
Although part of Comet 67P’s large lobe appears in this image’s foreground, the focus is on the small lobe behind. The alcove seen near the center separates the Hathor region (right) from the Anuket region. Scientists think the alcove’s layering could mimic the comet’s internal structure.
ESA/Rosetta/MPS/OSIRIS Team
Transitions abound in this part of the comet’s large lobe, seen above the smooth plains of the neck’s Hapi region at bottom. The image shows the boundary area between Khepry, the large rough-textured region that dominates the upper right, and the Aten (upper left), Babi (lower left), and Aker (below) regions.
ESA/Rosetta/MPS/OSIRIS Team
The large elongated depression known as the Aten region dominates this view of Comet 67P’s large lobe. The boulders in the depression measure up to 100 feet (30 meters) across. The smoother dust-covered Babi region lies below Aten in this orientation.