Celestial sketcher Erika Rix explains how to capture quickly evolving solar prominences using black paper and pastel pencils.
By Erika Rix |
Published: August 24, 2015 | Last updated on May 18, 2023
Key Takeaways:
Just like clouds on a calm day, solar prominences appear almost motionless. Attempt to draw them, however, and you’ll discover that both evolve at such a rate that you struggle to keep up. But with a few pointers and following this simple technique, you will soon capture these fascinating structures in record time.
Prominences are regions of relatively cool, high-density gas that lie above the Sun’s surface. Observing them requires a narrowband solar filter centered on the Hydrogen-alpha (Hα) spectral line, a specific color of red. If you want to spot the faintest details, you need to escape the Sun’s brightest glare. I use both a black solar cloth and a flat shield to block out any light except what’s coming through the eyepiece, causing me to look like an old-time photographer.
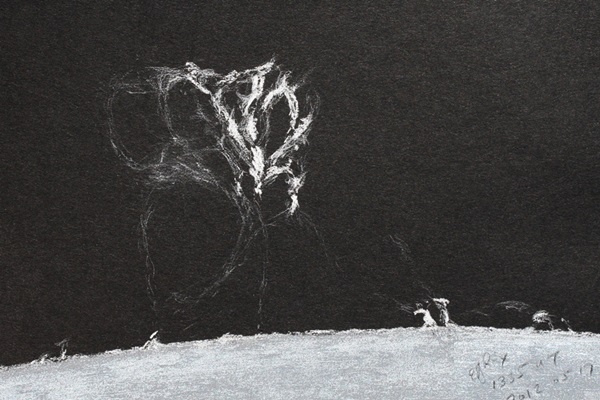
The author drew the shallow arc of the Sun’s limb first and then added the brightest sections of the prominence with a pastel pencil. They functioned as marker points for the remainder of the sketch. She captured this event May 17, 2012, through a 2.4-inch Hydrogen-alpha telescope with a 400mm focal length and 8mm eyepiece for a magnification of 50x. For the sketch, the author used a white Conté crayon and pastel pencil, a white Prang colored pencil, and black Strathmore Artagain paper.
All sketches: Erika Rix
The sketch media is both basic and effective. All in white, it consists of a pastel stick, a pastel pencil, and a colored pencil. I use black acid-free paper to represent the dark backdrop of the eyepiece view, which has the added benefit of reducing glare when I make additions to the sketch.
Prepare the limb, the part of the Sun’s edge with the prominence, by drawing a shallow 5-inch arc on the paper with the flat edge of the pastel stick. Next, fill in the area, and then blend with your fingertips. When the limb is complete, study the prominence through your eyepiece until faint wispy details become visible.
The author used a white colored pencil to render faint strands within the large plume before it changed shape.
I use the pastel pencil to draw the brightest strands of the prominence first. Look closely at their shapes and relative positions as you sketch, and make sure you draw them to scale with the limb.
A colored pencil has a harder lead that produces faint, slender markings. It works well for detailing, so use that next to add the gauzy wisps within the brighter pastel markings. The harsh pastel will soften as you draw new additions through them. Alternate between the two pencils until the prominence is complete. Because a prominence’s shape can change so quickly, strive to complete your sketch in 10 minutes or less.
Working quickly, she completed the remainder of the prominence by drawing the threads that connected to the limb.
I like to create a series of drawings to capture the changing shape of a prominence over an extended period of time. The one shown below started off a third of its size before breaking free, over five hours later, from the magnetic field that supported it. See an animation of the full eight-sketch sequence below.
As always, feel free to share comments or questions with me at erikarix1@gmail.com. Clear skies!
The author raced time to finish with an accurate and lovely solar prominence.