Key Takeaways:
- Collimation aligns a telescope's parts for the sharpest images.
- Most telescopes need collimation at some point; reflectors need it often.
- Tools like laser collimators or Chashires help align the telescope's mirrors.
- Proper collimation ensures you get the best views from your telescope.

To make your observing stress free and fun, your telescope should produce great images. To ensure its best
performance, learn how to collimate your optics.
The big day’s here: Your first telescope has arrived. You’ve done your research and decided on an 8-inch Dobsonian-mounted reflector, or perhaps a 4-inch refractor, or another model that had a great review. You spend an hour or so unpacking and assembling the telescope. You can hardly wait for nightfall. You take it out in the backyard, manage to find a few targets, and…
What’s going on? No matter what you do, you simply can’t get a clear image. You can’t see Jupiter’s belts. Saturn is a teacup with two handles. And lunar craters blur out. Is your telescope a dud?
More than likely it just needs to be collimated.
A definition
Collimation is the process of aligning all components in a telescope to bring light to its best focus. All telescopes need to be collimated at some point; however, it’s easy to perform this task on some and a bit more involved for others. For simplicity, I’ll talk about the three major types (and one subtype) of telescopes and point out when you need to collimate.
There are two types of collimation: optical and mechanical. Optical collimation aligns a telescope’s optical surfaces to bring the image to the correct orientation in the focal plane. Mechanical collimation is necessary when the physical components in your scope don’t line up properly — a focuser isn’t square to the tube, a mirror isn’t centered in the tube, or a secondary mirror is misaligned. Further complicating the matter, your telescope could appear to be optically collimated without being mechanically collimated.
Recognizing issues
The easiest way to check a telescope’s collimation is to wait until the optics have cooled, pick a bright star, place it in the center of the eyepiece’s field of view, and defocus slightly, first one way, then the other. These two non-focused regions are called inside and outside focus. Inside focus refers to the eyepiece’s focal point falling inside the light cone; it’s the reverse for outside focus. The diagram on p. 59 shows these points, along with perfect diffraction rings. If the rings aren’t centered, odds are good that the telescope is not collimated correctly. Certain designs — reflectors and Schmidt-Cassegrain telescopes, or SCTs — require collimation every time you set up.
Refractors are factory aligned, and due to their fixed lens, they hold collimation well. A refractor that doesn’t suffer an accident (like a drop) typically won’t need additional collimation over its lifetime. Some, however, may not arrive collimated, most likely due to shocks during transit. If that happens, especially for more advanced designs like triplets and Petzvals, I strongly recommend returning it for an exchange. If you purchased the scope used and don’t choose to return it to the seller, send it to the manufacturer for adjustment.
SCTs are a mixed bag. Some tend to require frequent collimation; others hold it well. As they say, your mileage may vary. The good news is SCT collimation is easy.
Maksutov telescopes — a design like the SCT — tend to hold collimation well. Unlike an SCT, however, collimating one isn’t easy. If a Maksutov needs collimation, it’s best to send it to the manufacturer or contact a professional because it’s generally difficult to access and adjust the primary mirror.
Finally, reflectors will need frequent collimation — as in, every time you transport it to a different site, and maybe even if you don’t. I collimate my observatory-based 18-inch reflector before every session. Fortunately, collimating a reflector is simple. Once you get the process down, it takes only a few minutes.
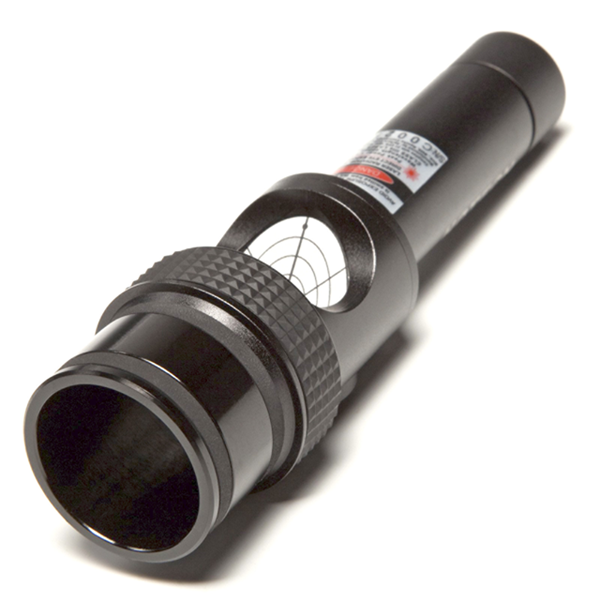
A laser collimator emits a beam that bounces off the primary and secondary mirrors in a reflector and (hopefully) back onto the collimator’s target.
Collimation cap: A collimation cap, or sight tube, is a plug that fits in your reflector’s focuser. It has a small central hole. Although it’s mainly used to ensure that your secondary mirror is aligned with respect to your focuser, it can also be used to ensure correct alignment of the secondary and primary mirrors.
Cheshire: This collimator adds a set of crosshairs to a sight tube. Many amateurs I know who own reflectors think a Cheshire is the best way to go in terms of proper collimation.
Laser collimator: Even though a laser collimator has advantages and disadvantages (the optics can be slightly out of alignment and yet look perfect), it’s always been my preferred “quick” method. It sits in the focuser and shines a beam that ideally reflects onto the hole it came from.
But if the telescope is so far out of collimation that the return beam doesn’t even hit the secondary mirror, it’s useful to point it at a nearby wall to help make the initial adjustments. In a pinch at night, I’ve aimed it at a friend. (If you do this, be certain their eyes are closed because laser light can harm vision.)
Before using any laser collimator, make sure it’s trued. Turn it on and roll it along a flat surface, projecting the beam on a wall. If it scribes a straight line, you’re good to go. If not, there’s usually a way to adjust it.
Star test: A star test is free, easy, and works with any type of telescope. The only disadvantage is that not all nights have good enough seeing (atmospheric steadiness) to ensure that the diffraction rings are centered around the star.
Collimating an SCT
Make sure your mount is on and tracking. Insert an eyepiece that will give you moderate to high magnification, and center a fairly bright star, but not the brightest you can see. If you typically observe with a star diagonal, make sure it’s in place. If you’re not using a motorized mount and you’re in the Northern Hemisphere, you can collimate on Polaris.
Defocus slightly until you see a doughnut of light. If your scope is out of collimation, the doughnut’s hole won’t be centered. On the corrector of most modern SCTs, you’ll find a plastic circle, which is the back of the secondary mirror’s mount. There you’ll find three adjustment screws. If you don’t see them, there’s probably a cover to remove.
You’ll need a Phillips screwdriver or an Allen wrench. The screws tend to be small, so be certain to use a tool that fits properly. Because using metal tools so close to optics makes me nervous, I recommend replacing the screws with a set of knobs for safer and easier adjusting. Make small corrections, one screw at a time, look through the eyepiece, and observe the change in the alignment. Continue to adjust these screws until the hole is centered in the doughnut. Once it is, focus a bit more until you can see the diffraction rings, and use them to fine-tune the collimation. Ideally, you should need to adjust only two of the screws.
Some SCTs, particularly older ones, suffer from mirror shift, where the primary flops slightly to one side of the cell as the telescope crosses the meridian. For the best results, collimate on the side of the sky where you’ll be observing. If you pass the meridian, you should check collimation again. The process might seem slow at first, but you’ll gain speed with practice.
There are tools that let you collimate an SCT during daylight, but they are fairly expensive. They can be a good purchase if your time is valuable, or if you are part of an observing group that can split the cost.
Before you even think about this process, I suggest you mark the center of your primary mirror. Almost every amateur astronomer who has done this has used a white adhesive binder reinforcement ring — if you’ll be using a laser (highly recommended), there must be a hole in the middle of your marker for a reflection. Correctly placing the marker is critical. Optical defects increase the farther you move from the center. This can be a significant issue, especially with fast mirrors.
In a reflector, three things need alignment: the primary, the secondary, and the focuser (ultimately the eyepiece). Glance down the focuser in the daytime and identify each of these items in the reflection of the secondary.
My personal preferences for Newtonian collimation are both a Cheshire and a laser collimator. And if you’re collimating a 2″ focuser, I strongly recommend using a 2″ laser collimator. A 1¼”-to-2″ adapter can misalign the laser.
Step one is to ensure that the secondary mirror is centered under the focuser. Insert the Cheshire and inspect the position of the secondary. It may need to be moved forward, backward, or even rotated slightly. You may also need to adjust the spider mount (the thin metal vanes that hold the secondary) to slide it side to side or up and down. When correctly positioned, the secondary should appear centered and circular. You should need to do this only once. The rest you’ll do every time you set up.
Next, the laser collimator comes into play. While you could do this step with a Cheshire, a laser makes it far simpler. Insert it into the focuser and adjust the secondary mirror, using its adjustment screws, until the beam falls on the spot you previously marked on the primary mirror. Be careful that the reflected beam doesn’t hit you in the eye.
Now comes the most critical step. Adjust the primary mirror to ensure that the reflection is headed into the center of the focuser. On the back of the mirror cell are typically three adjustment screws (or six push-pull adjustment screws). With the laser on and in the focuser, you want to adjust the primary so the beam returns to the place it’s emitted from.
If the scope is way out of alignment, you might want to point the front toward the side of a building. Any non-reflective surface will do. Then change the tilt of the mirror by using the adjustment screws. Do this by moving only two of the three screws, and make only small adjustments. Leave the third adjustment screw alone unless you run into the limit of one of the others. After each adjustment, check the front of the laser to see if the beam is there. If so, you’re on target.
After everything is aligned, a star test will confirm proper collimation. This won’t always be possible because the seeing may not be good.
The last — and best — recommendation I can give you for collimating your telescope is to find a friend who’s willing to help. Photos, diagrams, and articles are great, but it’s quicker and easier to collimate your scope if you have a friend to tell you if you’re moving in the right direction. Otherwise, you’ll be back to look at the laser every time you turn a screw. As a thank you, I’d suggest doughnuts. And coffee. Definitely coffee.
Collimation is a necessary process, but it’s not overly long or complicated. You spent good money on that telescope — get all the performance out of it that you can!