Besides being able to stretch the data, you can address vignetting and noise reduction all in one stroke by using the right tools. Furthermore, it is possible to record your steps and apply this library of corrections to every one of your frames. That way, the processing tools will do all the work for you. You can conceivably process a huge number of exposures for maximum signal-to-noise ratio as long as you dither every one of the images.
Let’s assume you have thirty 2-minute exposures of subject matter taken in RAW file format. What you want to do is apply to all 30 the adjustments that you made to a “master” frame. Let me show you how by using Adobe Bridge CS6.
1. On the desktop, make a new folder and name it for the object you imaged. In my example, it will be “M42.” This is where your finished files will go.
2. In Bridge CS6, choose “Filmstrip” mode for viewing all your exposures.
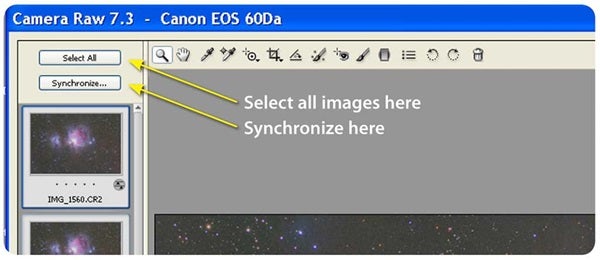
4. Find the first image, and click on it. Then hold down the shift key, scroll the filmstrip until you find the last image, and click on it. That should have selected all the images. Release the shift key.
5. Pick one of the selected images by right-clicking on it. From the menu, choose “Open in Camera Raw.”
6. Here’s where you can have some fun. Take all the controls in “Camera Raw” and make your image look as good as you can, including doing spot enhancements with the “Adjustment Brush.” You can apply myriad tools including curves, noise suppression, and color and detail enhancements, just to name a few.
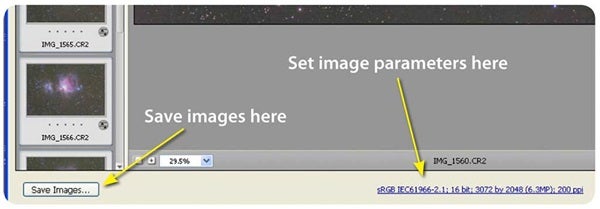
8. Under the master frame, you will see some data. Click on it. Here you will set the color space, bit depth, size, and resolution of your saved image.
9. Once you have specified these parameters, click “Save Images” in the lower left corner. Here you will designate the file name, the destination folder (for me, it’s M42), and the file format.
10. When you click “OK,” “Camera Raw” will save every one of the enhanced images into your new folder.
In next month’s column, we’ll take these dithered images into RegiStar and have the software batch-process the tedious alignment procedure. Then we will combine subsets with a median/mean function to average the aligned images and remove outliers. We’ll then take the master frames from each subset and average them for a “grand master” 16-bit TIFF file.

