In this remarkable age, space is becoming ever more accessible to the general public, and citizen scientists are enriching the field of professional astronomy with their contributions. NASA’s latest flagship spaceborne observatory, the $10 billion James Webb Space Telescope (JWST), is no exception: Following the tradition set by the Hubble Space Telescope, NASA releases data from JWST to the public, much of it immediately after it has been gathered. Here is a quick start guide on how to access that data and use it to create your own stunning celestial images.
Getting the data
Begin by searching for “MAST Portal” in your web browser, or by visiting the following link: MAST stands for the Mikulski Archive for Space Telescopes, named for Barbara Mikulski, a former U.S. senator from Maryland who played a pivotal role as an advocate for space exploration funding during her tenure between 1986 and 2017.
Click on the blue Advanced Search link at the top of the page, where a new window will pop open. There, locate the Mission box near the top-right corner, type “JWST,” and press Enter. On the left-hand side under Columns, choose Release Date and scroll down to find the corresponding box on the right-hand side.
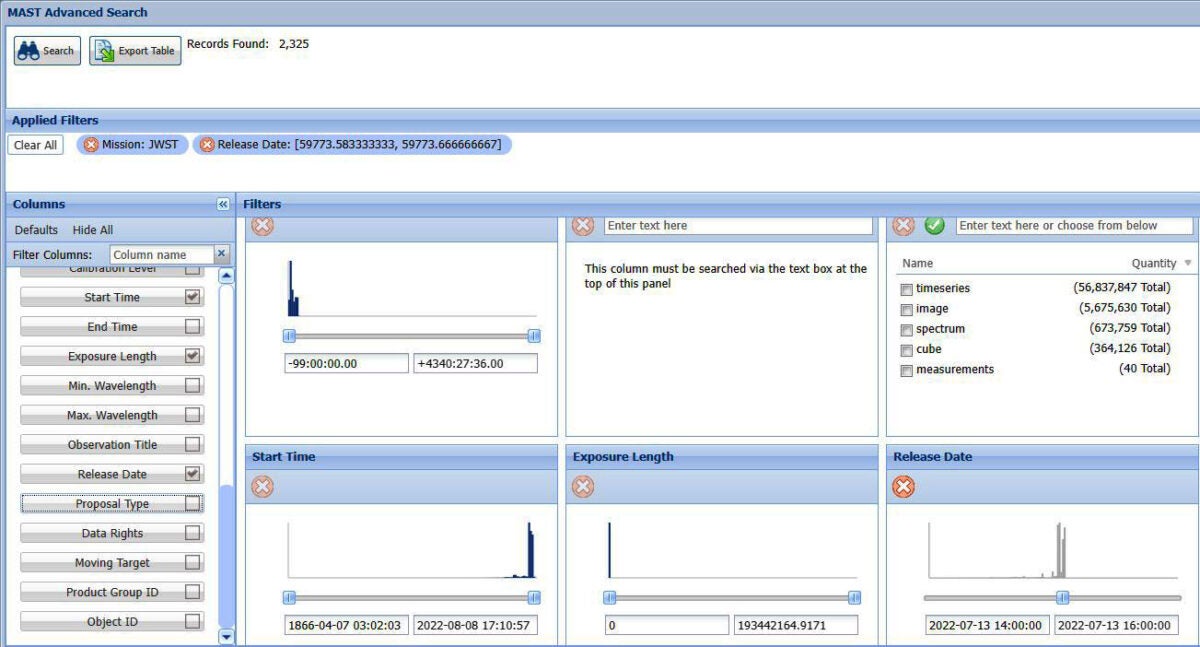
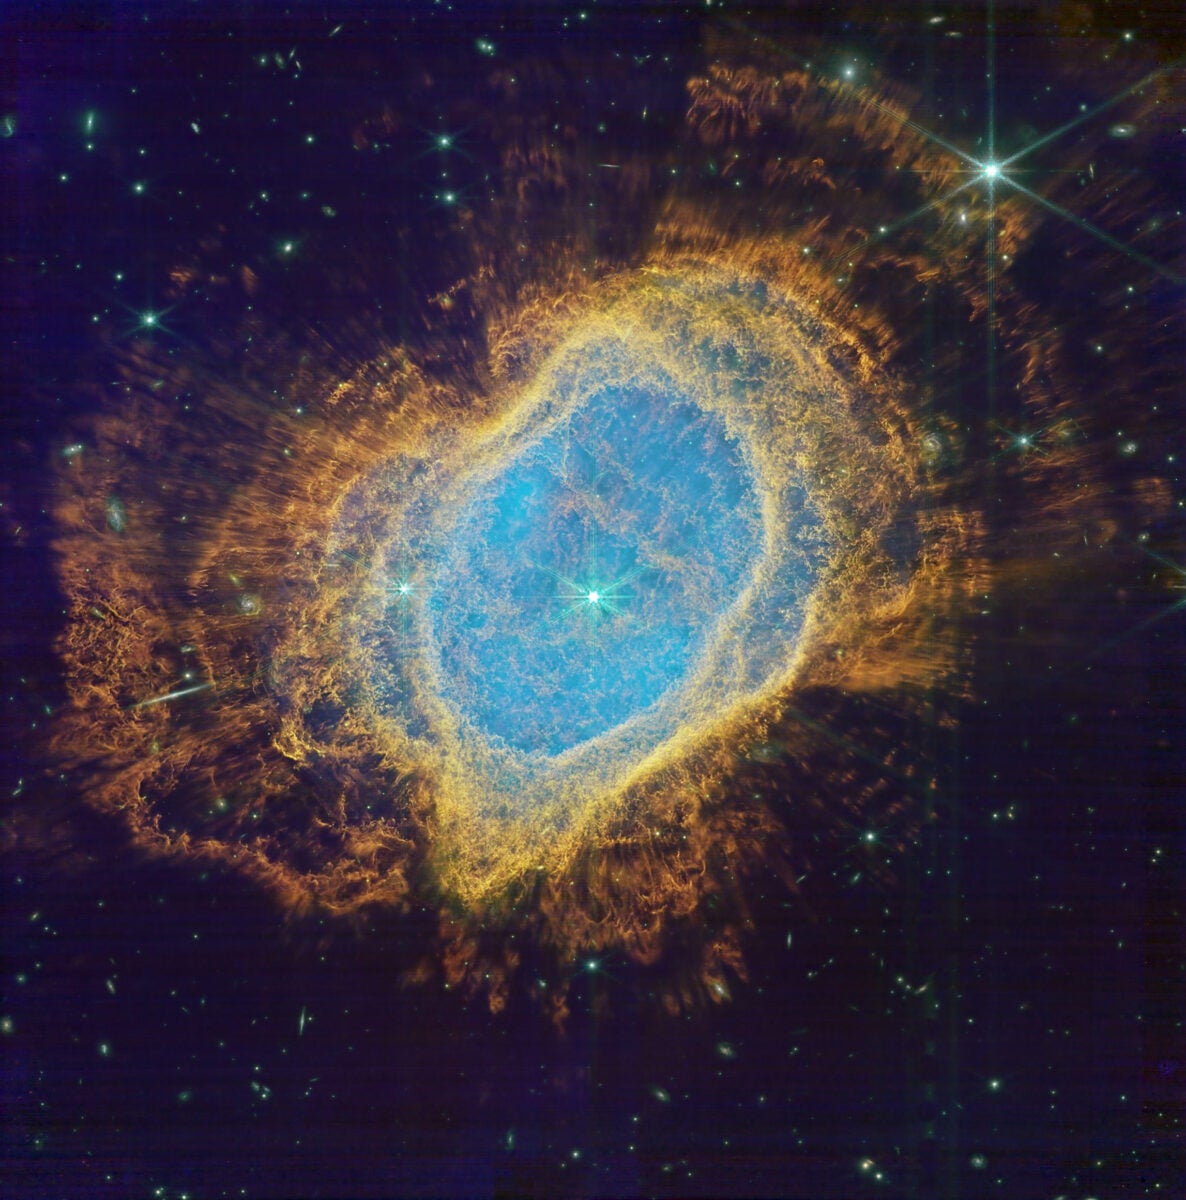
For this story, our specific target is NGC 3132, known as the Southern Ring Nebula. It was one of the earliest sets released. To find it, set the end date to “2022-07-13 16:00:00” [Fig. 1]. Clicking Search at the top-left corner will reveal the individual records.
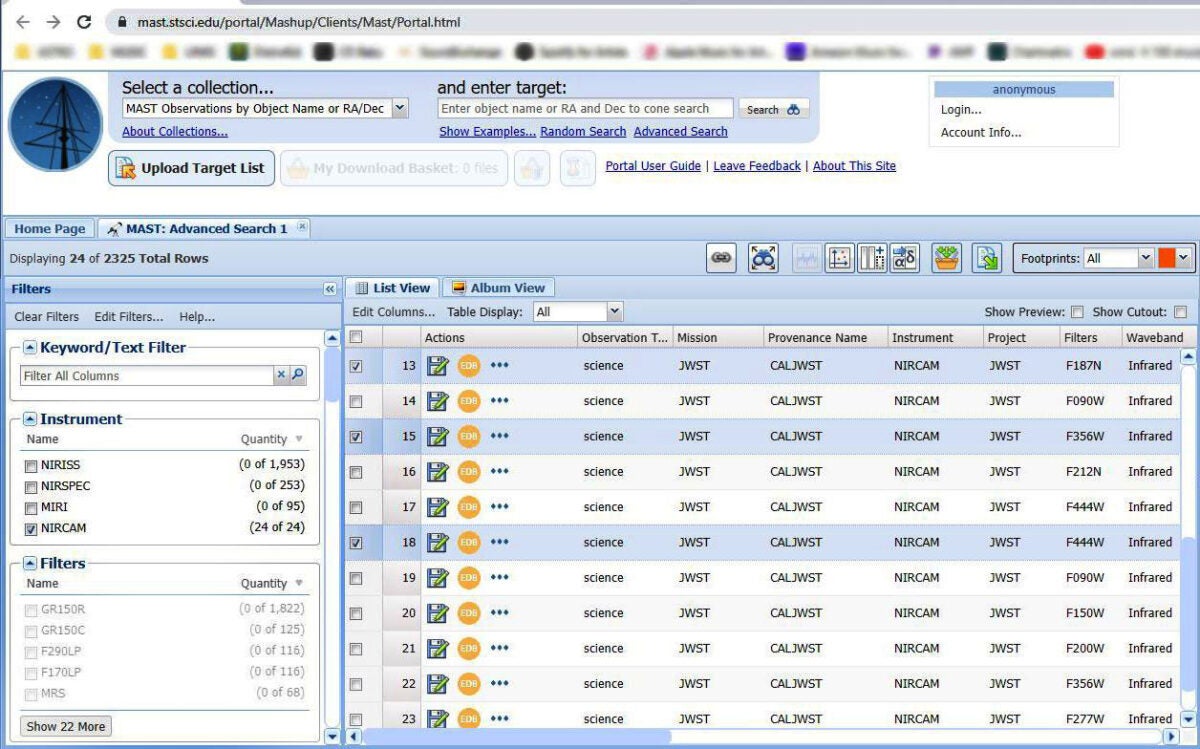
In the blue Filters column on the left side (not to be confused with the Filters box in that column), find the Instrument box and select near-infrared images by ticking the checkbox next to NIRCAM/IMAGE. Depending on the width of your monitor and browser window, you may need to scroll with the blue bar at bottom until you reach the Target Name column. Also note the Filters column. Through my experimentation, I found that the filters F187N, F356W, and F470N (also listed with filter F444W) proved to be the most striking. Click on the floppy disk icons corresponding filters to download the zipped folders to your computer [Fig. 2].
Organizing the data
After extracting a record, navigate to the parent folder, with an identical MAST name, finally entering the JWST directory. Next, open the folder with NIRCAM in the name, discarding all files except the one with the Flexible Image Transport System (FITS) extension ending in “i2d.” Double-clicking this file opens seven individual files in your chosen image-processing application, mine being Pleiades Astrophoto’s PixInsight (PI). Of these files, the first one to open will bear a _SCI suffix and is the only file required. When you’re done opening the data you will have three files ready for post-processing, each ending in “i2d_SCI” with the filter names: f444w_f470n, f356w, and f187n.
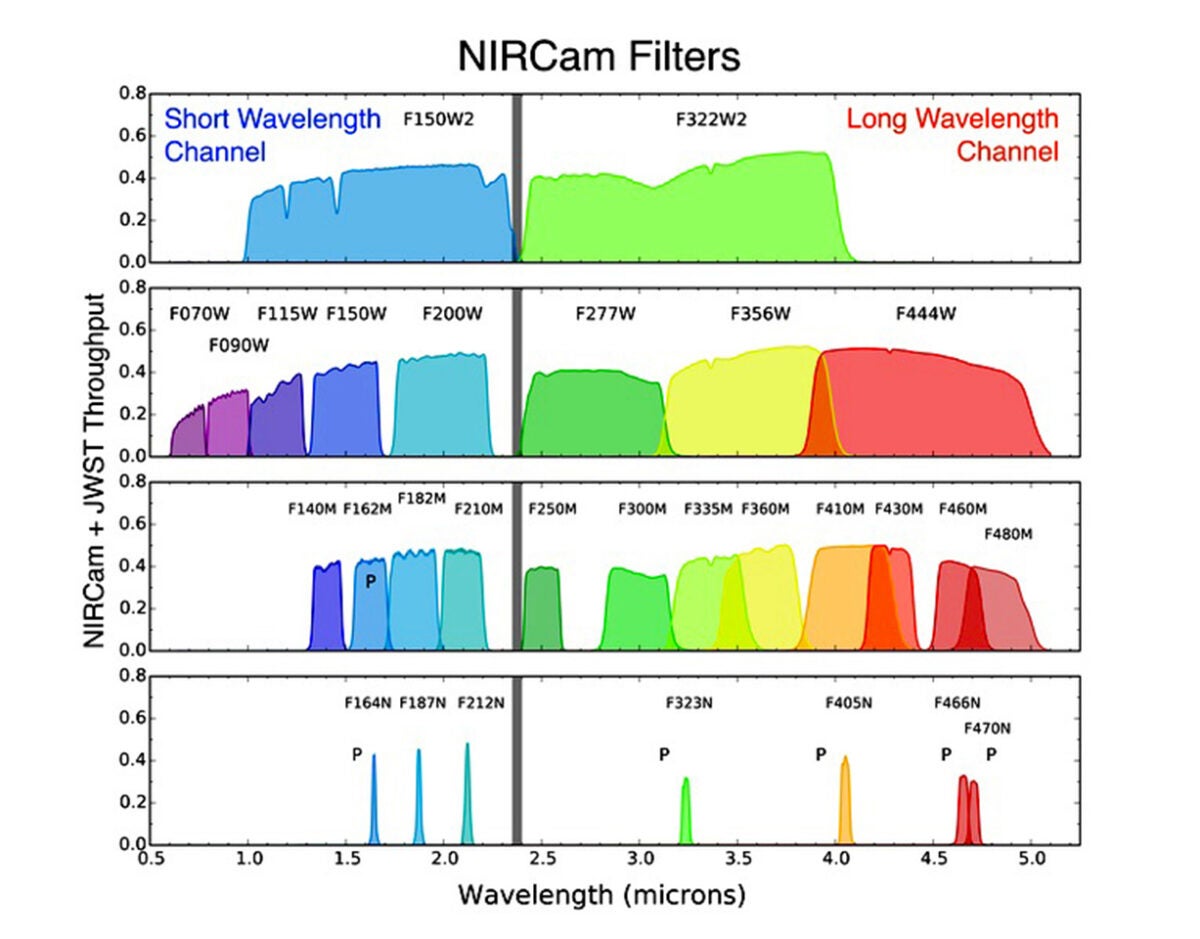
For those who process narrowband images, the technique of assigning invisible data to perceivable colors is a familiar concept. Because JWST can see outside the visible range, we have to assign colors to each of these filters we’re using, assigning them to red, green, and blue channels. Determining the most suitable assignment of these filters is important. To assist in this process, search the web for “NIRCam filters – JWST user documentation.” This resource includes a comprehensive set of plots showing the transmission lines of each filter, spanning from short to long wavelengths [Fig. 3].
While you don’t have to follow the wavelength order, I did find it the most visually appealing. I chose to assign the shortest wavelength data (F187N) to the blue channel, the long wavelength data (F470N) to red, and the medium wavelength data (F356W) to green.
Processing the data
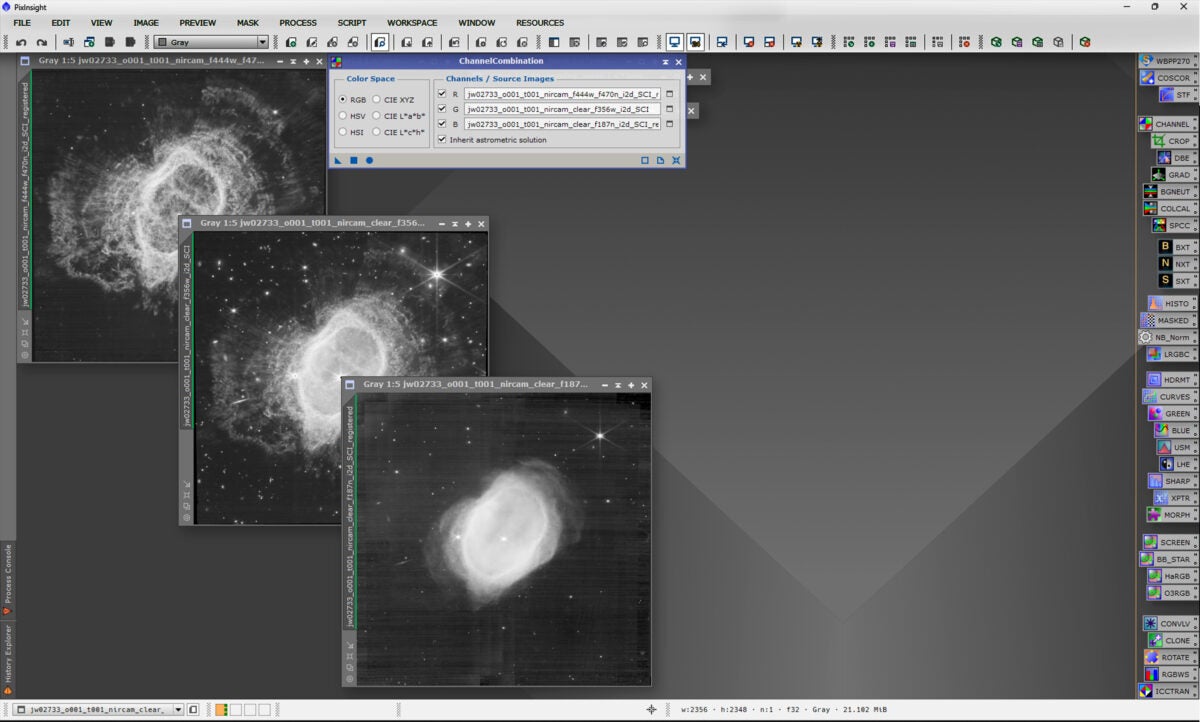
As the three files were not registered to one another, I applied PI’s StarAlignment process to the f444w_f470n and f187n frames, using the f356w image as the reference image since it offered the strongest star contribution. After marrying the three aligned files with the ChannelCombination process [Fig. 4], I cropped the image’s edge artifacts with DynamicCrop. Skipping a few steps (such as gradient removal and color calibration) only required for ground-based, broadband images, I applied the BlurXTerminator (BXT) deconvolution plugin to enhance the nebular detail and tighten the stars; I found that BXT also greatly reduced the multipoint diffraction spikes caused by JWST’s segmented mirror.
While the image’s background noise was not objectionable, my attempts to further reduce it proved to be a challenge. RC Astro’s NoiseXTerminator plugin is usually terrific, but in this case it was not useful — perhaps because its AI algorithm has not yet been trained on much JWST data. I then turned to PI’s native MultiscaleLinearTransform program for the task. While its noise-reduction tool did a great job of smoothing the noise, its onboard Linear Masking feature did not provide enough protection for the fine detail of the outer parts of the nebula. Nevertheless, it’s worth repeating that even without any noise reduction, the image was in good shape and ready for delinearization, better known in astroimaging as stretching. (Users of traditional photo-editing software like Photoshop and Lightroom can think of this as using levels and curves to control the image tones and enhance contrast.)
Transferring an unlinked AutoStretch from the ScreenTransferFunction (STF) to the HistogramTransformation (HT) process and applying it to the image, results in a permanent, nonlinear stretch with great, initial color. The only adjustments I made to the transferred curves before applying HT were to independently raise the black points of the R, G, and B channels to increase the contrast.
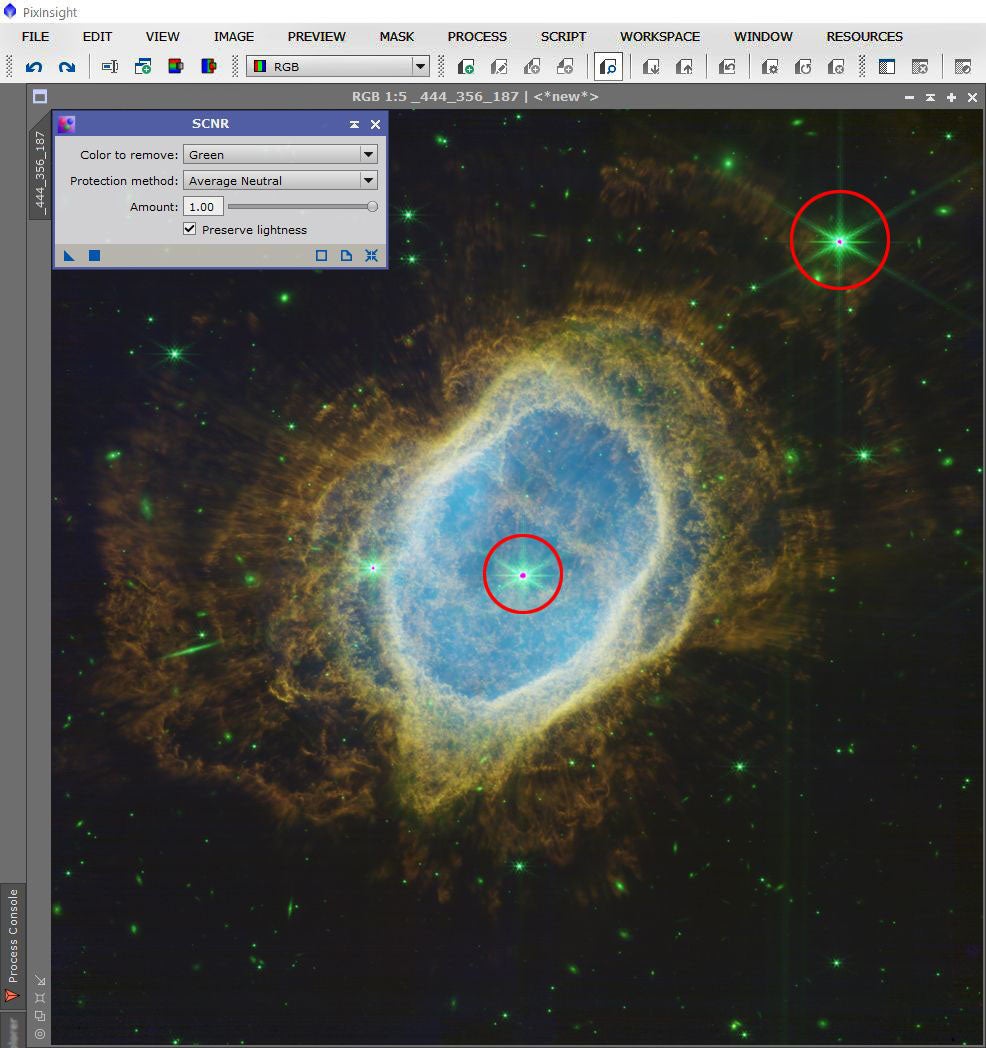
I then applied Subtractive Chromatic Noise Reduction (SCNR) to reduce a strong green cast in the stars and background galaxies. Changing the protection method from the default setting to Maximum Neutral prevented the nebula’s core from turning too blue [Fig. 5]. While the degree of color saturation for any given image is strictly a matter of taste, I felt that the existing amount was about perfect.
This is the point where I generally remove the stars from an image so I can focus on processing the deep-sky object by itself, adding the stars back in later. (See my article “Erasing stars with AI tools” in the April 2023 issue for more on this technique.) However, in this case, I found that doing so removed too much of the nebula’s fine, filamentary detail, so I decided to skip this step. Instead, I used PI’s RangeSelection tool to create a mask that targeted the nebula and ignored the stars.
To increase local contrast, rather than using Local Histogram Equalization (LHE) — as is practically de rigueur in astroimaging — I used UnsharpMask as an alternative with a large standard deviation (40) and a tiny amount (0.11). LHE as well as MultiscaleMedianTransform (MMT) would be great choices for further increasing contrast and sharpness. The image was already so tack sharp that I added just a touch of wavelet-based MMT sharpening.

To bring out more of the structure of the nebula’s core, I used the scaling to intensity setting of the HDRMultiscaleTransform process with a mask [Fig. 6]. This compressed the brightness level, revealing hidden detail while adding some color saturation.
With what I felt was a completed picture, I turned to a touch of cleanup with the CloneStamp (CS) tool. If you have an astute eye, you’ll note two cosmetic problems. One is a greenish, vertical stripe in the lower-right quadrant of the image. You can use CS to cover it well enough so that it is less noticeable. Second, there are the odd magenta dots at the cores of a few saturated stars, and with a bit of finesse, CS will again solve that problem.
As with any image-processing software worth its salt, there are myriad options, and you may find other approaches that work better for creating your own masterpieces. Don’t be afraid to explore.